The Butterfly Cake Shop Blog
Chocolate Mini Cupcake Recipe

Here is my basic Chocolate cupcake recipe for mini cupcakes. enjoy!
Ingredients
120g Butter or margarine
2 Eggs
120g Caster sugar
95g Self-raising flour
25g Cocoa Powder
1 tbsp full fat milk
1 tsp oil
1 tsp Vanilla Extract
Makes: 24 MINI cupcakes
Instructions
Preheat your oven to 160C/320F/ GAS MARK 3 or 140C/284F fan. Line your mini cupcake tin with mini cupcake cases.
Use your stand mixer with the whisk attachment or a hand mixer. Mix butter, sugar, and Vanilla extract on high speed for 5 minutes, scraping the bowl's sides halfway through. This is called the creaming stage
Add flour, Cocoa, eggs, milk, and oil. Mix for 2 more minutes until you have a glossy smooth cake batter. Use either our mini muffin scoop to add one scoop of cupcake mix to each mini cupcase case or use a piping bag to fill each case. you want the cases 2/3 full.
Cook in the centre of the oven for approximately 20 minutes, but check on them at the 15 minute point through the glass. All ovens vary, so be sure to keep an eye on the mini cupcakes as they cook. you may find yours need less time.
Remove from the oven and leave the cupcakes in the tray for 30-60 seconds, then transfer them onto a wire rack to cool down.
Once cool, decorate them or store in a zip lock bag/Tupperware box and freeze until needed.
FAQs
My cupcake cases are peeling. What did I do wrong?
Sometimes it can be due to using low-quality cupcake cases. I only ever use pme mini cupcakes cases as they are great quality. Most of the time the cupcakes haven’t been baked long enough or you left them in the tin to cool for too long. we also sell the pme mini cupcake foil cases which are very strong and foil cases rarely peel.
My cupcakes are overbaked when they come out of the oven, what went wrong?
Everyone’s ovens are slightly different. The issue can also be that your oven is running hotter than the setting you put it on. Invest in a thermometer that goes inside your oven to ensure your temperature is accurate.
My cupcakes have sunk when I removed them from the oven. How can I stop this?
If they are sinking, they are underbaked. You need to check your oven temperature is accurate, and if it’s not, adjust accordingly. Make sure you don’t remove them from the oven too early or open the oven door during cooking.
What size mini cupcake case should I use?
I use pme mini cupcake cases which are the following measurements:
Base 3.1cm wide
Top 5.5cm wide
Height 2.3cm
I can’t get self-raising flour in my country, what can I do?
You need to add 1 teaspoon of baking powder to your plain all-purpose flour, per mini cupcake batch..
How do I make this dairy-free?
Use margarine instead of butter and oat milk instead of cow's milk.
How can I make the cupcakes gluten-free?
Substitute flour for gluten-free flour. Add in 1/4 tsp xantham gum per 250g of flour to help bind the ingredients together.
How many trays of cupcakes can I bake at once?
This depends on your oven size but for a standard home oven I would only ever bake 2 trays at a time. In the middle of the oven. If you bake them at the top they will overcook and baking them at the bottom means they will be undercooked.
The tops of my cupcakes are slightly hard, is this normal?
Yes! These cupcakes will form a slight crust (like bread when it forms a crust) but once you’ve flat iced your cupcake, this will completely soften the top. You could also use a small amount of sugar syrup on top. Freezing the cupcakes will also soften the top. Please don’t be put off by the top having a slight “crust”. All cakes do.
My cupcakes have risen over the top of the cases when baking. What happened?
You’ve put too much batter in the cases. You want to make sure the cupcake cases are no more than 2/3 full.
my mini cupcakes are a bit dry, how can i fix this?
Mini cupcakes are very small cakes, they are essentially one bite. it’s easy to over bake them. i always recommend freezing your mini cupcakes over night. This helps to lock in moisture and makes the cupcake much tastier.
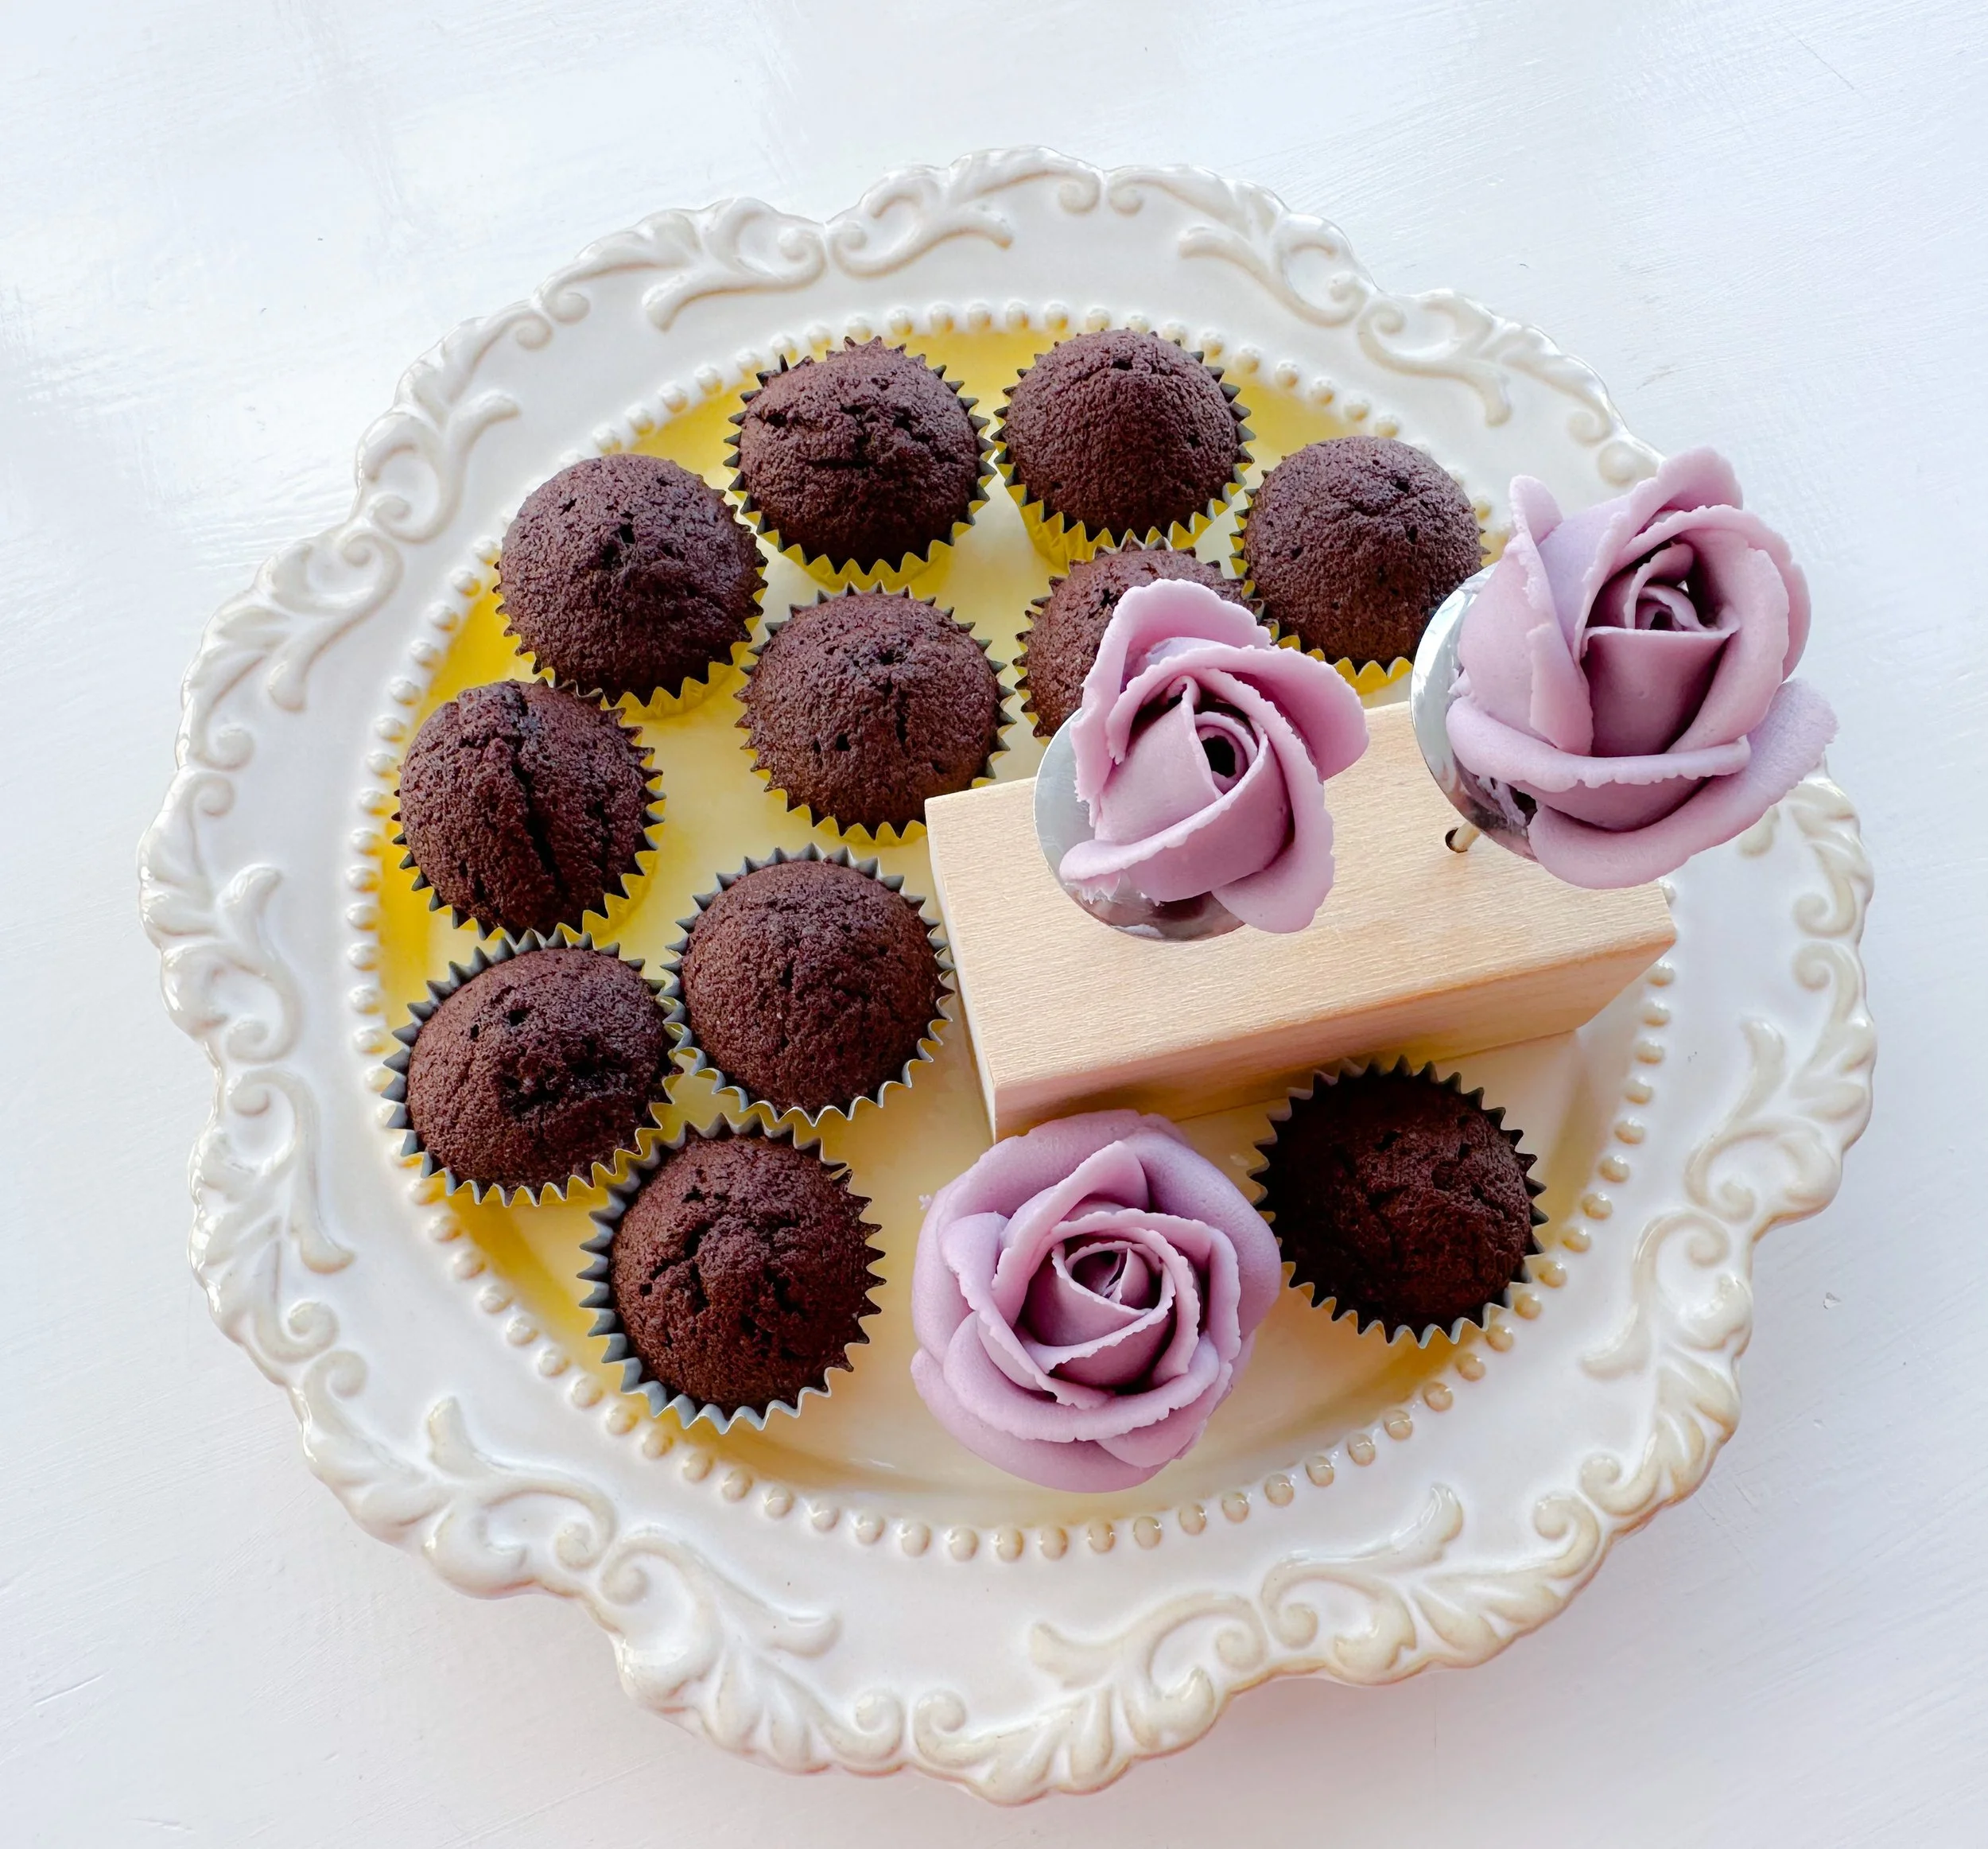
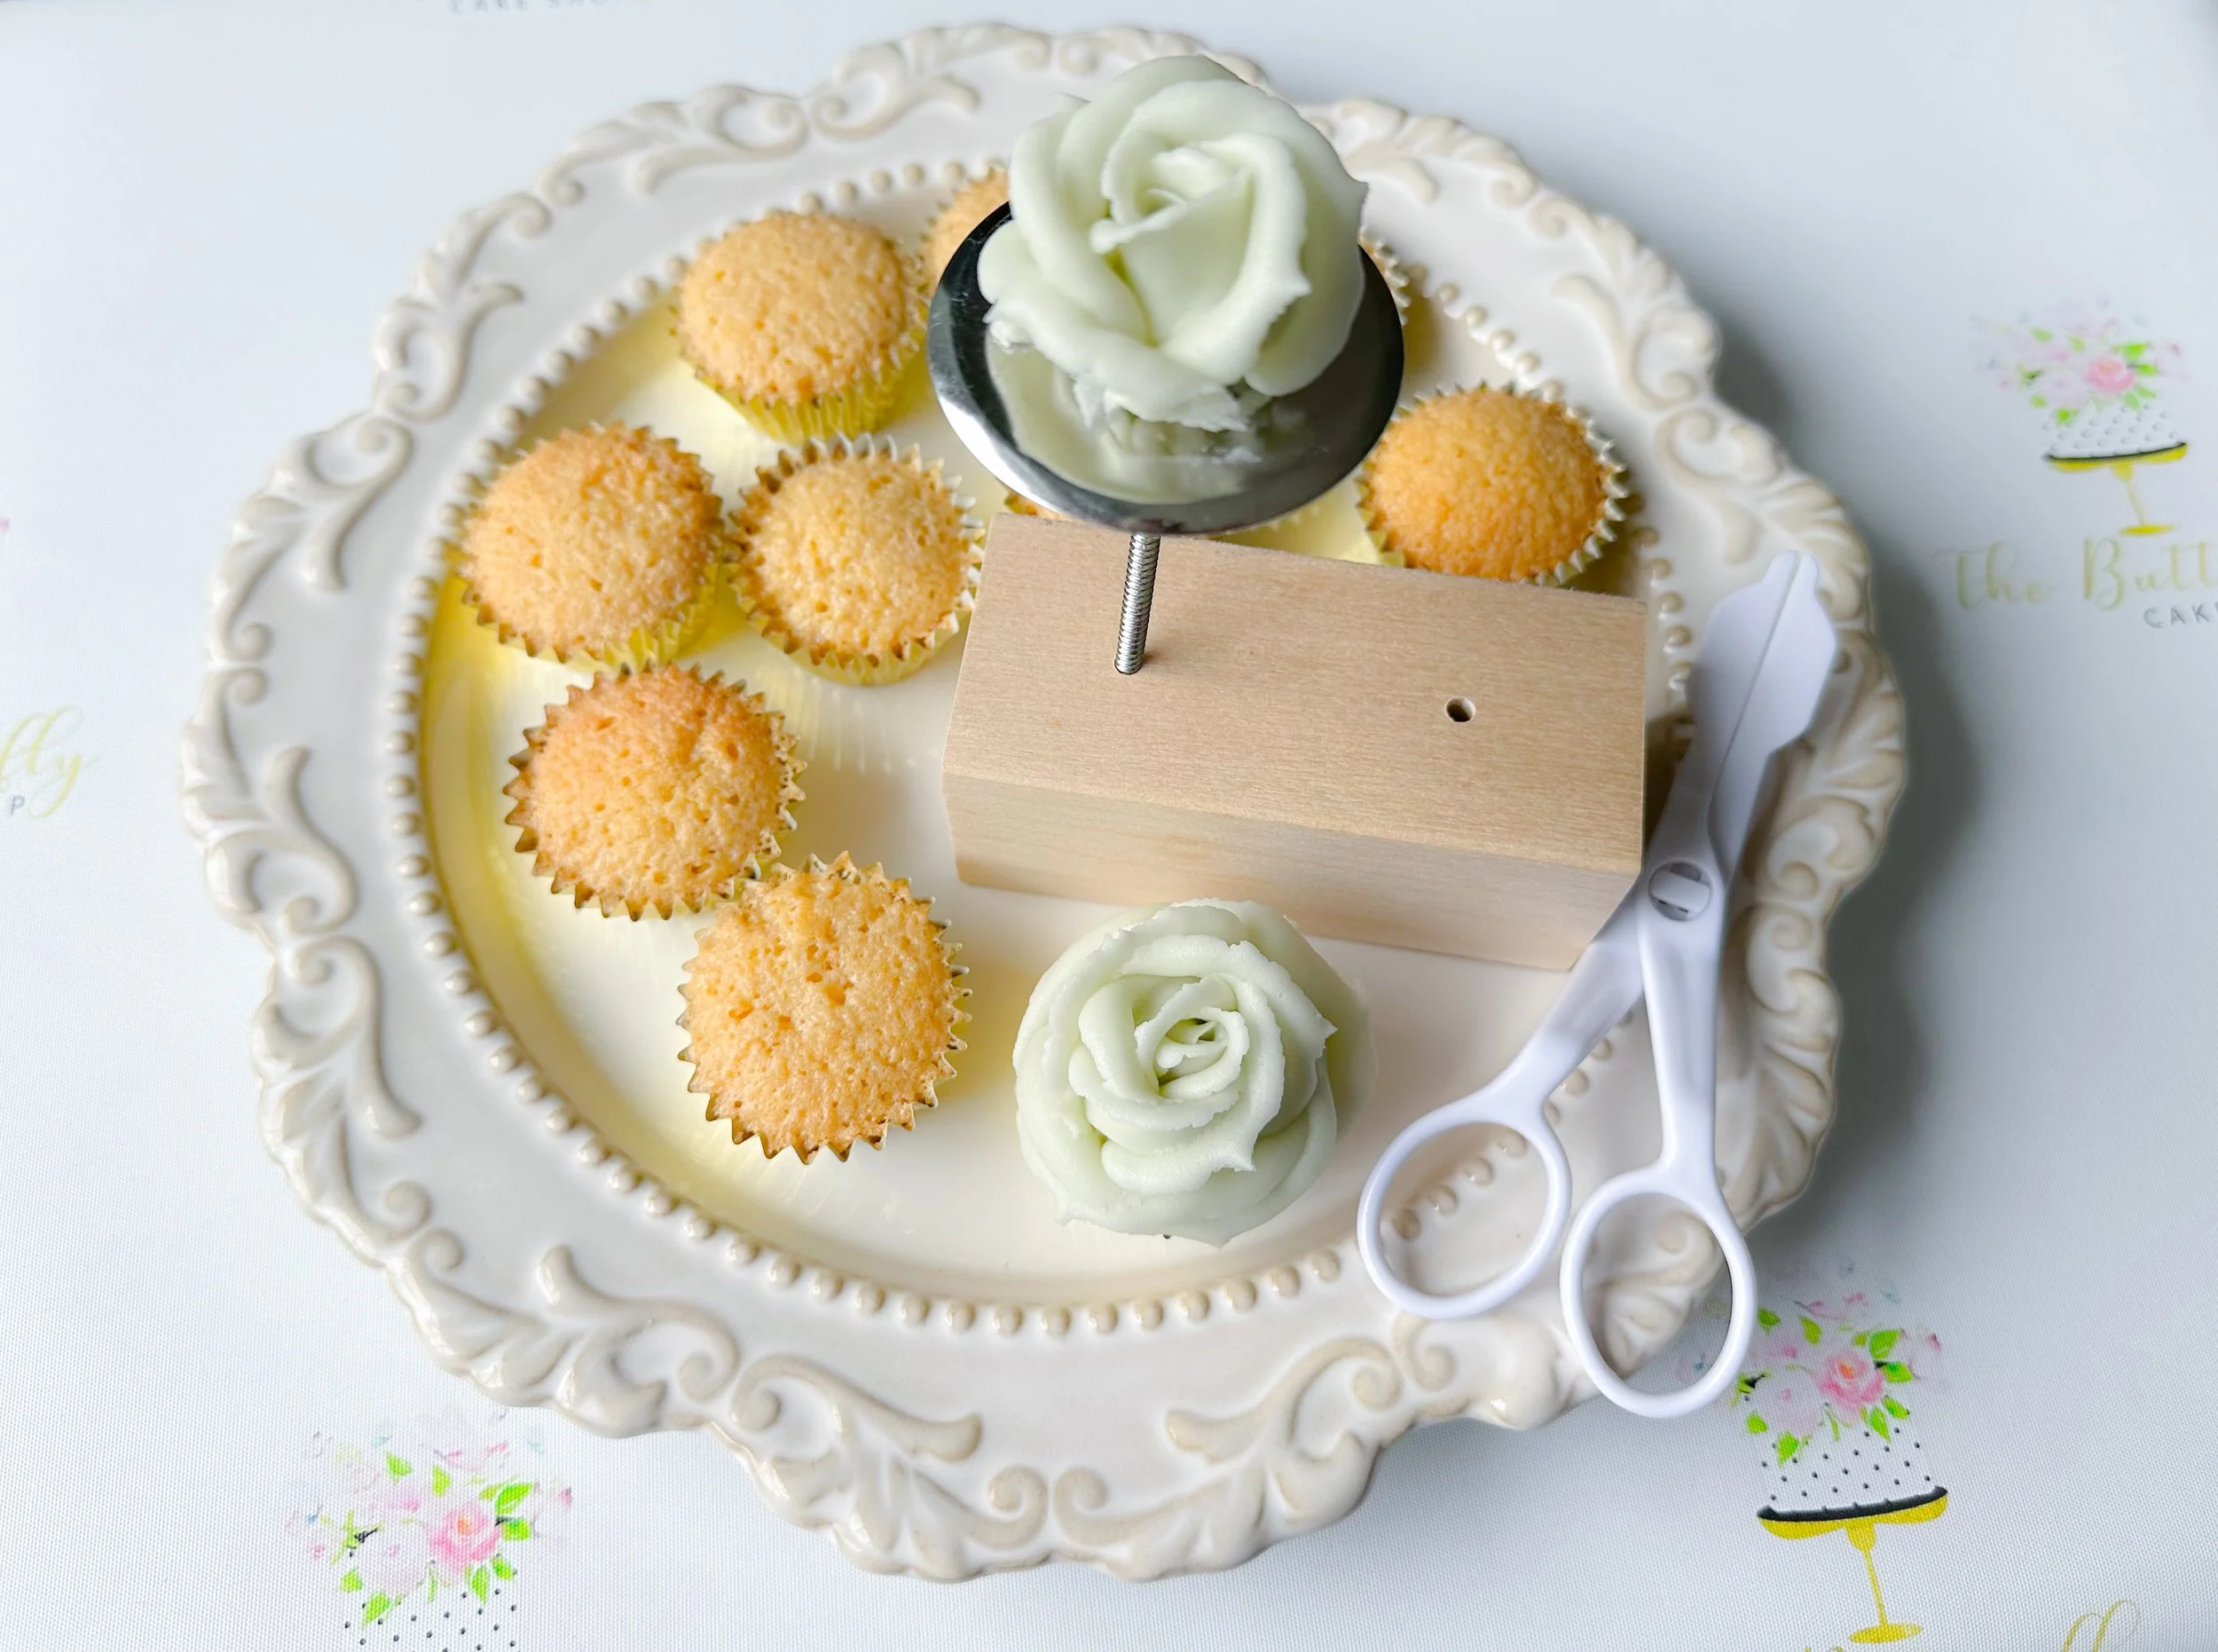
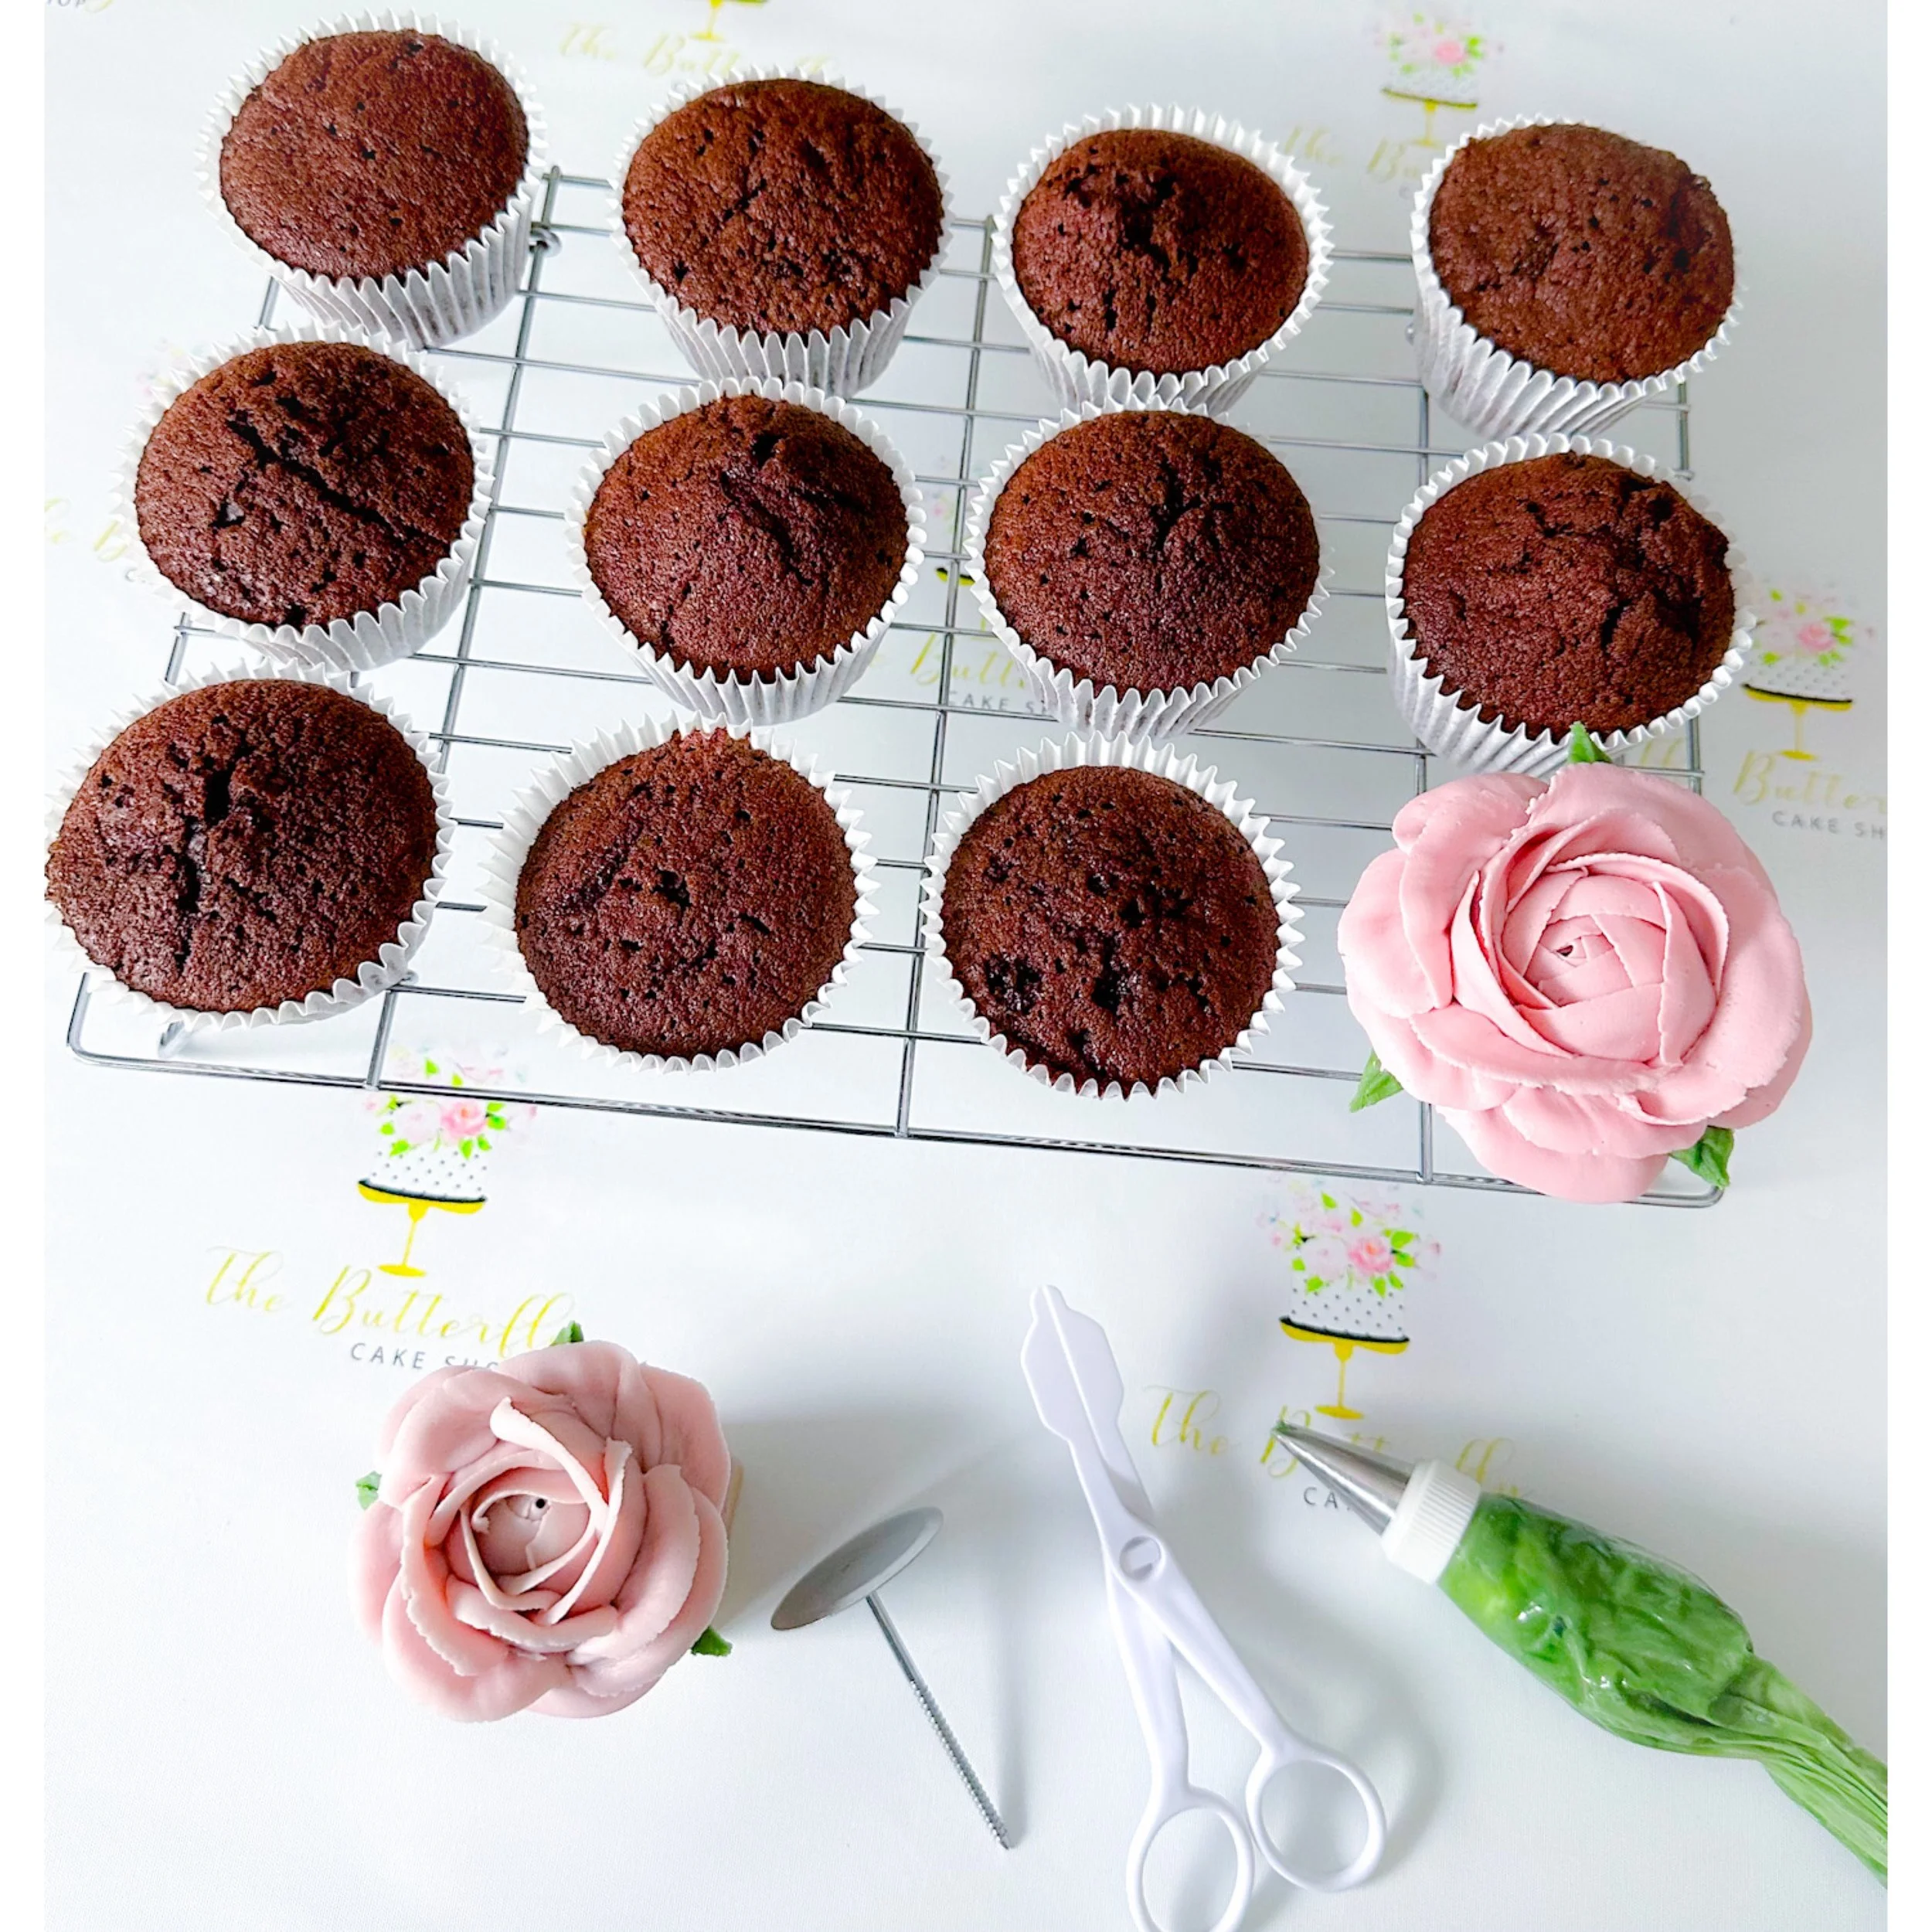
i’m struggling to pipe onto the mini cupcake with out squashing it at the same time, help!
these cupcakes are so tiny, it’s so hard not to do this. freeze your mini cupcakes fully and pipe onto the frozen cupcake instead. this makes the cupcakes more robust. alternatively pipe on to a flower nail and trasnfer your flower using flower scissors.
I really hope you enjoy making these mini chocolate cupcakes. Do let me know how you get on in the comments section below.
Kirsty x

Buttercream & Baking Tips and Tricks

Buttercream & Baking Tips and Tricks
I wanted to put together a blog post with lots of tips and tricks I’ve acquired over the years. If you have anything to add please leave a comment at the bottom of this blog.
Enjoy. Kirsty x
To make a beautiful deep red buttercream start with a dark pink base and then add sugarflair red extra.
To achieve black buttercream with out using large amounts of food colouring. Start with a dark brown base and then add sugarflair black extra. Buttercream with cocoa in it will also achieve the same result.
You can freeze decorated cupcakes. Store them in a cupcake box and freeze. Remove from freezer the day before you need them and defrost in the fridge in the cupcake box. This will keep condensation on the cupcake to a minimum. If you defrost at room temp you’ll likely end up with colour bleeding and water droplets on your flowers. Do not assemble a bouquet with frozen cupcakes as your flowers will be covered in condensation. This will stain the tissue paper and cause colours to run.
You can make buttercream flowers well in advance by freezing any piped flowers in a Tupperware box. Again defrost in the fridge to avoid condensation and water droplets forming.
Always allow your decorated cupcakes to crust over before assembling your bouquet. If not you will knock all of your beautiful work. You can also achieve this quicker by popping them in the fridge for 15 minutes. No your cupcakes won’t dry out. That will only happen if you leave them in there for a few days.
When using piping tips with small openings add a tiny amount of cooled boiled water to your buttercream so it’s easier to pipe with. This is especially helpful when piping stamens. Remember one consistency of buttercream won’t always work for every technique.
If you are finding your Russian nozzle flowers are not sticking to the cupcake or you’re being left with rough edges, add a small amount of cooled boiled water to your buttercream.
In summer use ice packs with a tea towel on top to place your piping bags on and have two bags for each tip on the go so you can alternate.
In winter you can add a small amount of boiled water to your buttercream to make it easier to pipe with or put small amounts of buttercream in the microwave on short intervals of 10 seconds instead.
To add a vintage look to your flowers add tiny amounts of brown food colour to your buttercream. This will help tone down bright colours like yellow for example.
Try and avoid putting really dark coloured flowers right next to white or cream flowers. You may find the colour transfers to your light coloured flowers.
If your edges are frayed on your petals it’s one of these reasons
Your bag isn’t tight enough when piping
Your buttercream is too warm
You’ve over mixed your buttercream
To achieve a translucency to your flowers coat the inside of your piping bag in a very thin layer of white buttercream.
Add a line of contrasting coloured buttercream down two sides of your piping bag and then fill the centre with green buttercream to achieve colour variations in your leaves. This also looks lovely when adding two lines of light green and then putting dark green in the centre.
great piping Tips to help change up your flowers centres are:
Bcs 28, bcs 105, Ateco 85, Jem 362, small Russian stamen tip
To pipe a 5,6 or 8 petal flower flat ice your cupcake and then use a palette knife to score lines along the top. That way you can assure even sized and spaced petals.
When piping 3 individual flowers on a cupcake top, flat ice the top and then use the base of a large Russian nozzle to mark the top of the cupcake, so you know where to pipe and to help keep things evenly spaced.
Use makido biscuits when piping tall flowers on your cupcakes. It will add support and its edible
If your buttercream is leaving grease marks on your tissue paper add in an extra layer of cellophane during the wrapping process. Sheet of cellophane, tissue paper and then another smaller sheet of cellophane. No more grease transfer.
If following my buttercream recipe, your buttercream will be good to use until the butter goes off as there are no extra ingredients. Always store it in the fridge
Don’t whip your butter when making buttercream. It will add in too much air and your flowers will look spongy. For thin realistic petals keeping mixing to a minimum.
If your cupcakes are slipping into the bouquet cups, use two squares of tissue around the cupcake instead of one. You can also put some tissue paper inside the cup too.
When working with frozen cupcakes, to prevent the cases from peeling as they thaw out, flat ice the top in buttercream. It will seal in the moisture and stop the case from peeling.
When mixing in paste food colours, take a table spoon of buttercream and mix the paste colour into this small amount. Then add this to the rest of the buttercream that you want coloured. This will prevent under mixing the colour in which will leave streaks and it will also prevent over mixing the whole portion of buttercream.
Adding a touch of violet (and I have found some blue shades work too) helps to remove yellow undertones in your buttercream. Meaning you use less whitener and save money.
Freezing your cupcakes will make them more moist and you can pipe directly on to a frozen cupcake
Remove air bubbles from your buttercream by pressing it against the side of the bowl using the back of a spoon. Don’t stir as this will add more. I do this by taking a small portion of buttercream and working it into the side of the bowl multiple times.
Use a large ice cream scoop to portion out your cupcake batter. This way each cupcake has the same amount of batter and they will all cook evenly.
If your piping tip is blocked pop the end of the tip in some hot water to get it moving again.
To speed up cleaning your piping tips. Pop them in a bowl of boiling water. After 10 minutes most of the buttercream will be dissolved and you can clean them much easier.
To add realism and depth to your petals add two colours into your piping bag. One lighter and one darker.
I hope you have found these useful!
Mini Cupcake Recipe

Mini cupcakes!
Here is my basic cupcake recipe for mini cupcakes. enjoy!
Ingredients
120g Butter or margarine
2 Eggs
120g Caster sugar
120g Self-raising flour
1 tbsp full fat milk
1 tsp oil
Flavourings of your choice
Makes: 24-28 MINI cupcakes
Instructions
Preheat your oven to 160C/320F/ GAS MARK 3 or 140C/284F fan. Line your mini cupcake tin with mini cupcake cases.
Use your stand mixer with the whisk attachment or a hand mixer. Mix butter, sugar, and your flavourings on high speed for 5 minutes, scraping the bowl's sides halfway through. This is called the creaming stage
Add flour, eggs, milk, and oil. Mix for 2 more minutes until you have a glossy smooth cake batter. Use either our mini muffin scoop to add one scoop of cupcake mix to each mini cupcase case or use a piping bag to fill each case. you want the cases 2/3 full.
Cook in the centre of the oven for approximately 20 minutes, but check on them at the 15 minute point through the glass. All ovens vary, so be sure to keep an eye on the mini cupcakes as they cook. you may find yours need less time.
Remove from the oven and leave the cupcakes in the tray for 30-60 seconds, then transfer them onto a wire rack to cool down.
Once cool, decorate them or store in a zip lock bag/Tupperware box and freeze until needed.
Flavour Variations
Vanilla: 1 teaspoon of vanilla extract per batch of mini cupcakes..
Lemon: Juice of half a lemon plus finely grated rind per per batch of mini cupcakes. added during final mixing stage or 1 teaspoon of lemon extract added at creaming stage.
Orange: Juice of half an orange plus finely grated rind per batch of mini cupcakes, added in the final mixing stage. Or 1 teaspoon of orange extract added at the creaming stage.
as these cupcakes are so small i do not recommend adding ingrediants like raspberries or chocolate chips. you could add nutella or biscoff to the batter but i would suggest removing some of the butter at the mixing stage.
FAQs
My cupcake cases are peeling. What did I do wrong?
Sometimes it can be due to using low-quality cupcake cases. I only ever use pme mini cupcakes cases as they are great quality. Most of the time the cupcakes haven’t been baked long enough or you left them in the tin to cool for too long. we also sell the pme mini cupcake foil cases which are very strong and foil cases rarely peel.
My cupcakes are dark brown when they come out of the oven, what went wrong?
Everyone’s ovens are slightly different. The issue can also be that your oven is running hotter than the setting you put it on. Invest in a thermometer that goes inside your oven to ensure your temperature is accurate.
My cupcakes have sunk when I removed them from the oven. How can I stop this?
If they are sinking, they are underbaked. You need to check your oven temperature is accurate, and if it’s not, adjust accordingly. Make sure you don’t remove them from the oven too early or open the oven door during cooking.
What size mini cupcake case should I use?
I use pme mini cupcake cases which are the following measurements:
Base 3.1cm wide
Top 5.5cm wide
Height 2.3cm
I can’t get self-raising flour in my country, what can I do?
You need to add 1 teaspoon of baking powder to your plain all-purpose flour, per mini cupcake batch..
How do I make this dairy-free?
Use margarine instead of butter and oat milk instead of cow's milk.
How can I make the cupcakes gluten-free?
Substitute flour for gluten-free flour. Add in 1/4 tsp xantham gum per 250g of flour to help bind the ingredients together.
How many trays of cupcakes can I bake at once?
This depends on your oven size but for a standard home oven I would only ever bake 2 trays at a time. In the middle of the oven. If you bake them at the top they will overcook and baking them at the bottom means they will be undercooked.
The tops of my cupcakes are slightly hard, is this normal?
Yes! These cupcakes will form a slight crust (like bread when it forms a crust) but once you’ve flat iced your cupcake, this will completely soften the top. You could also use a small amount of sugar syrup on top. Freezing the cupcakes will also soften the top. Please don’t be put off by the top having a slight “crust”. All cakes do.
My cupcakes have risen over the top of the cases when baking. What happened?
You’ve put too much batter in the cases. You want to make sure the cupcake cases are no more than 2/3 full.
my mini cupcakes are a bit dry, how can i fix this?
mini cupcakes are very small cakes, they are essentially one bite. it’s easy to overbake them. i always recomend freezing your mini cupcakes over night.. this helps to lock in moisture and makes the cupcake much tastier.
i’m struggling to pipe onto the mini cupcake with out squashing it at the same time, help!
these cupcakes are so tiny, it’s so hard not to do this. freeze your mini cupcakes fully and pipe onto the frozen cupcake instead. this makes the cupcakes more robust. alternatively pipe on to a flower nail and trasnfer your flower using flower scissors.
I really hope you enjoy making these mini cupcakes. Do let me know how you get on in the comments section below.
Kirsty x

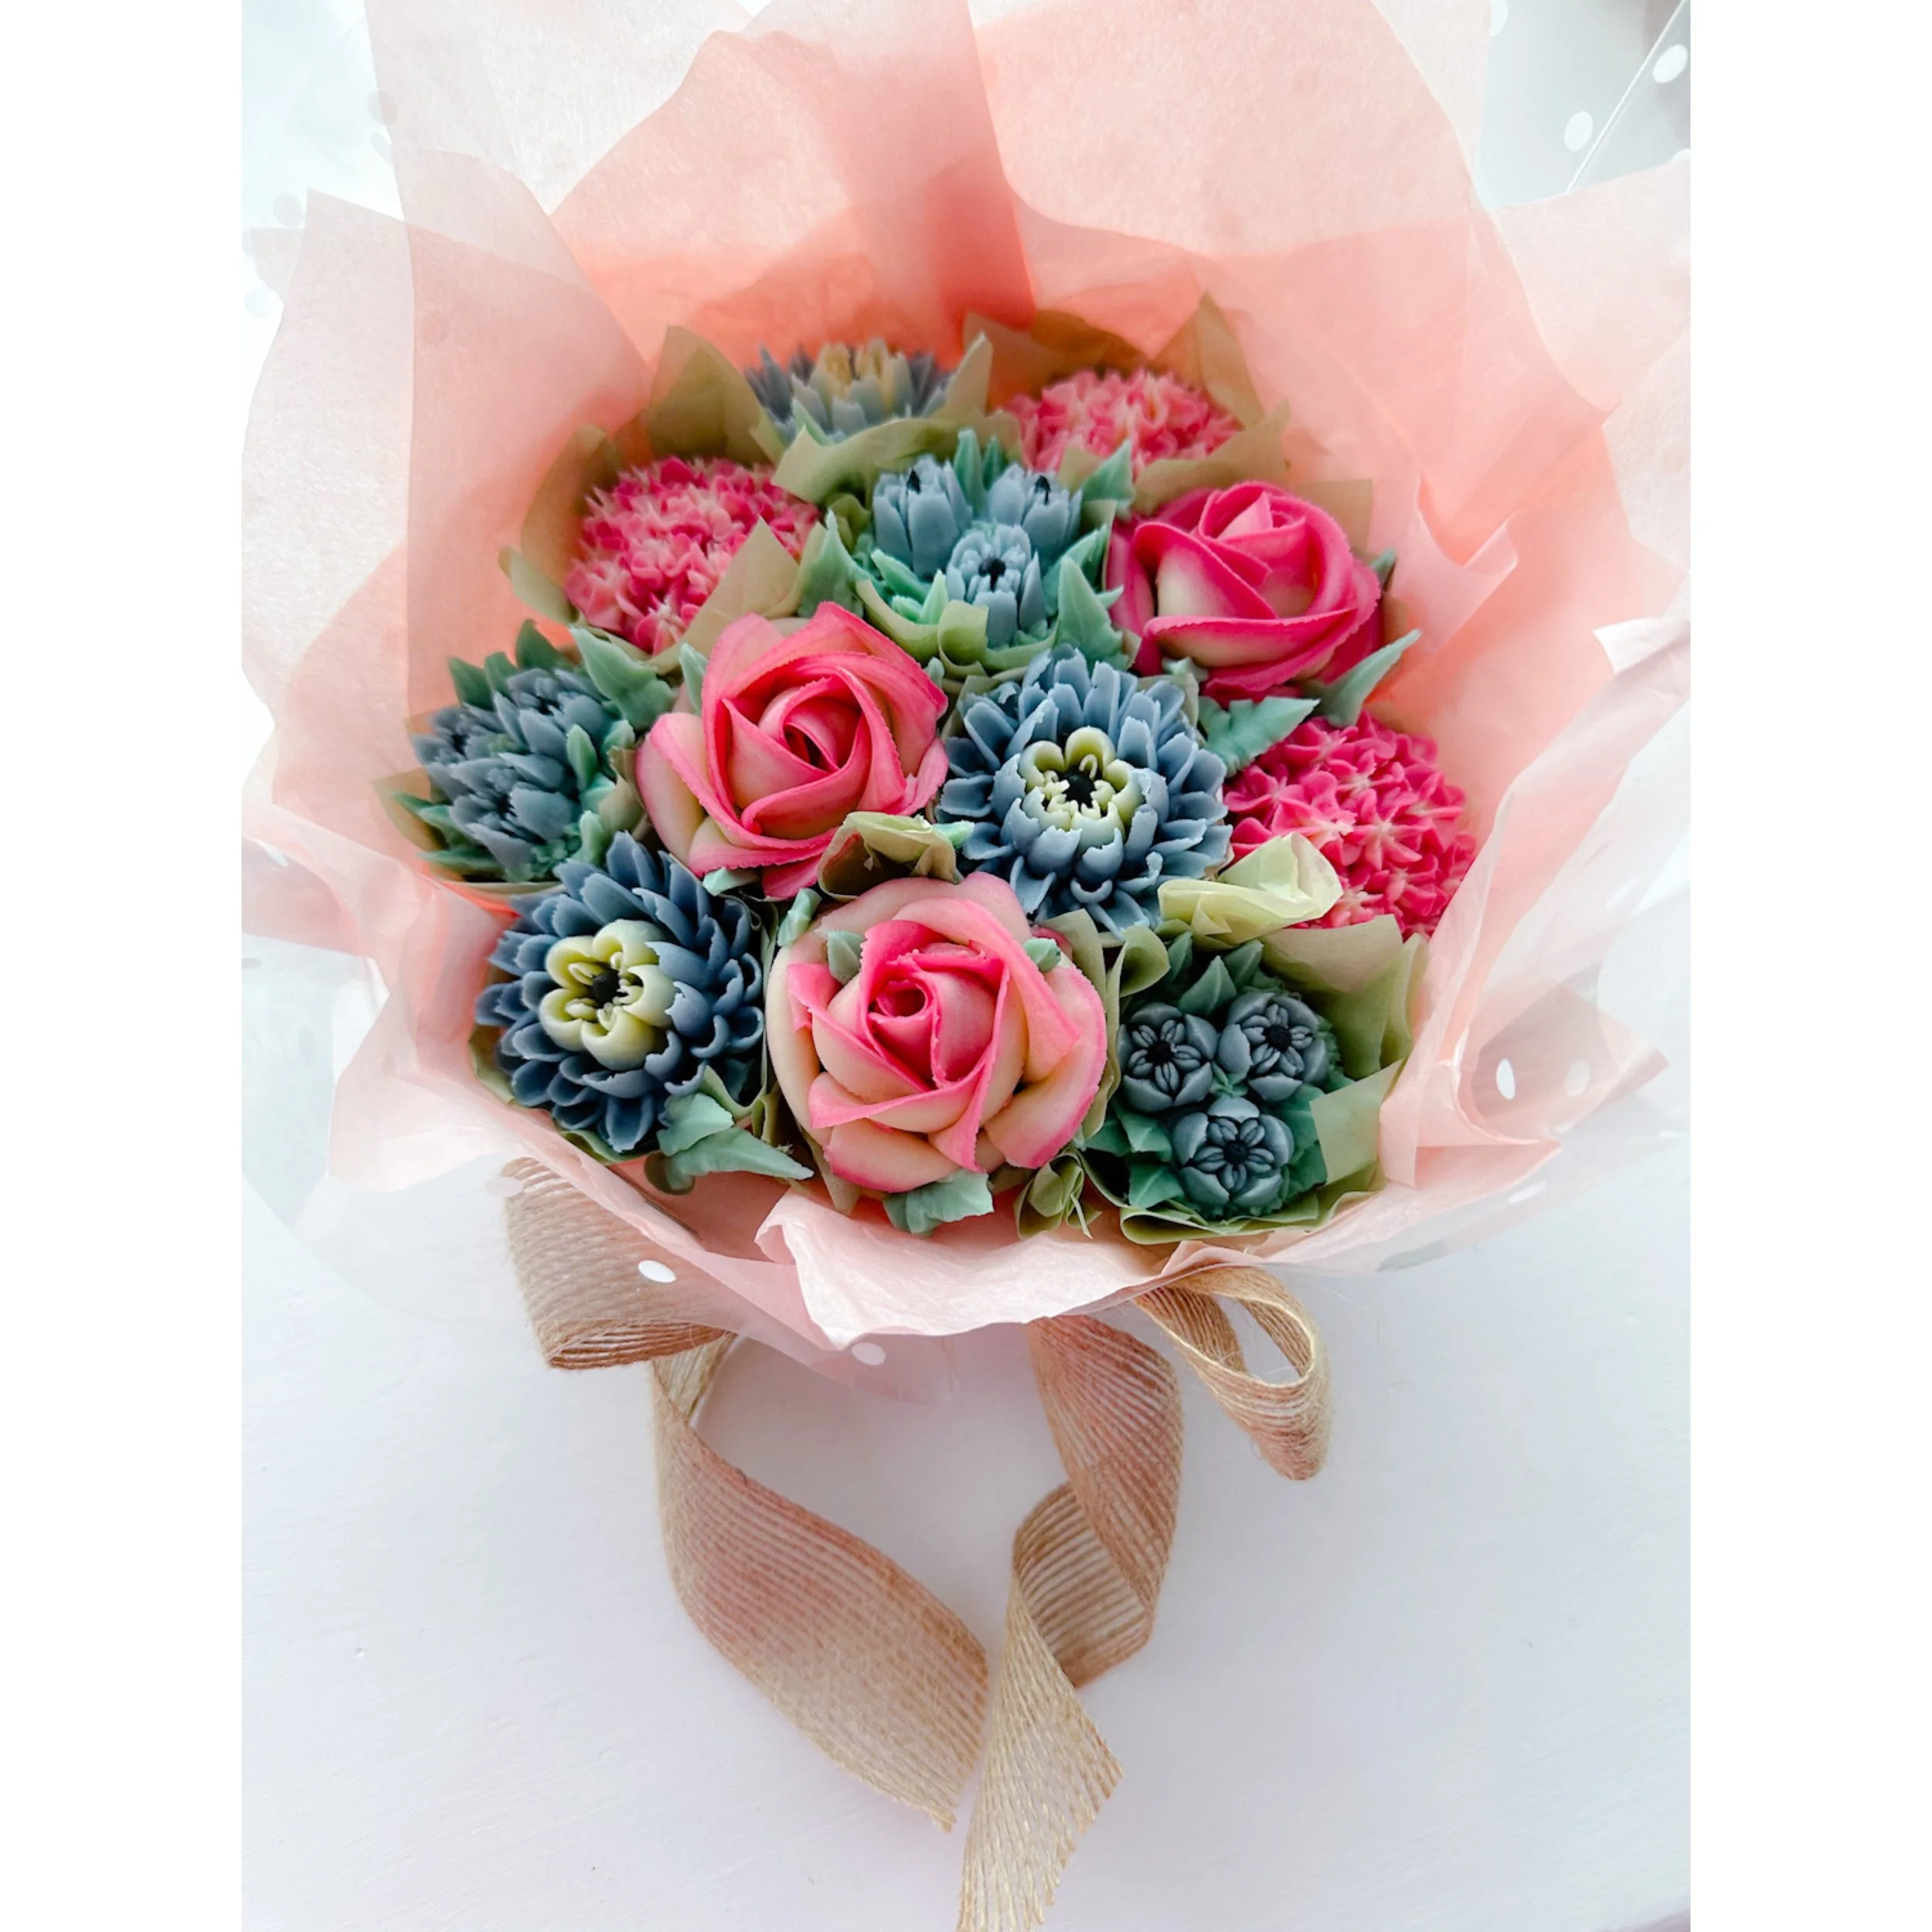
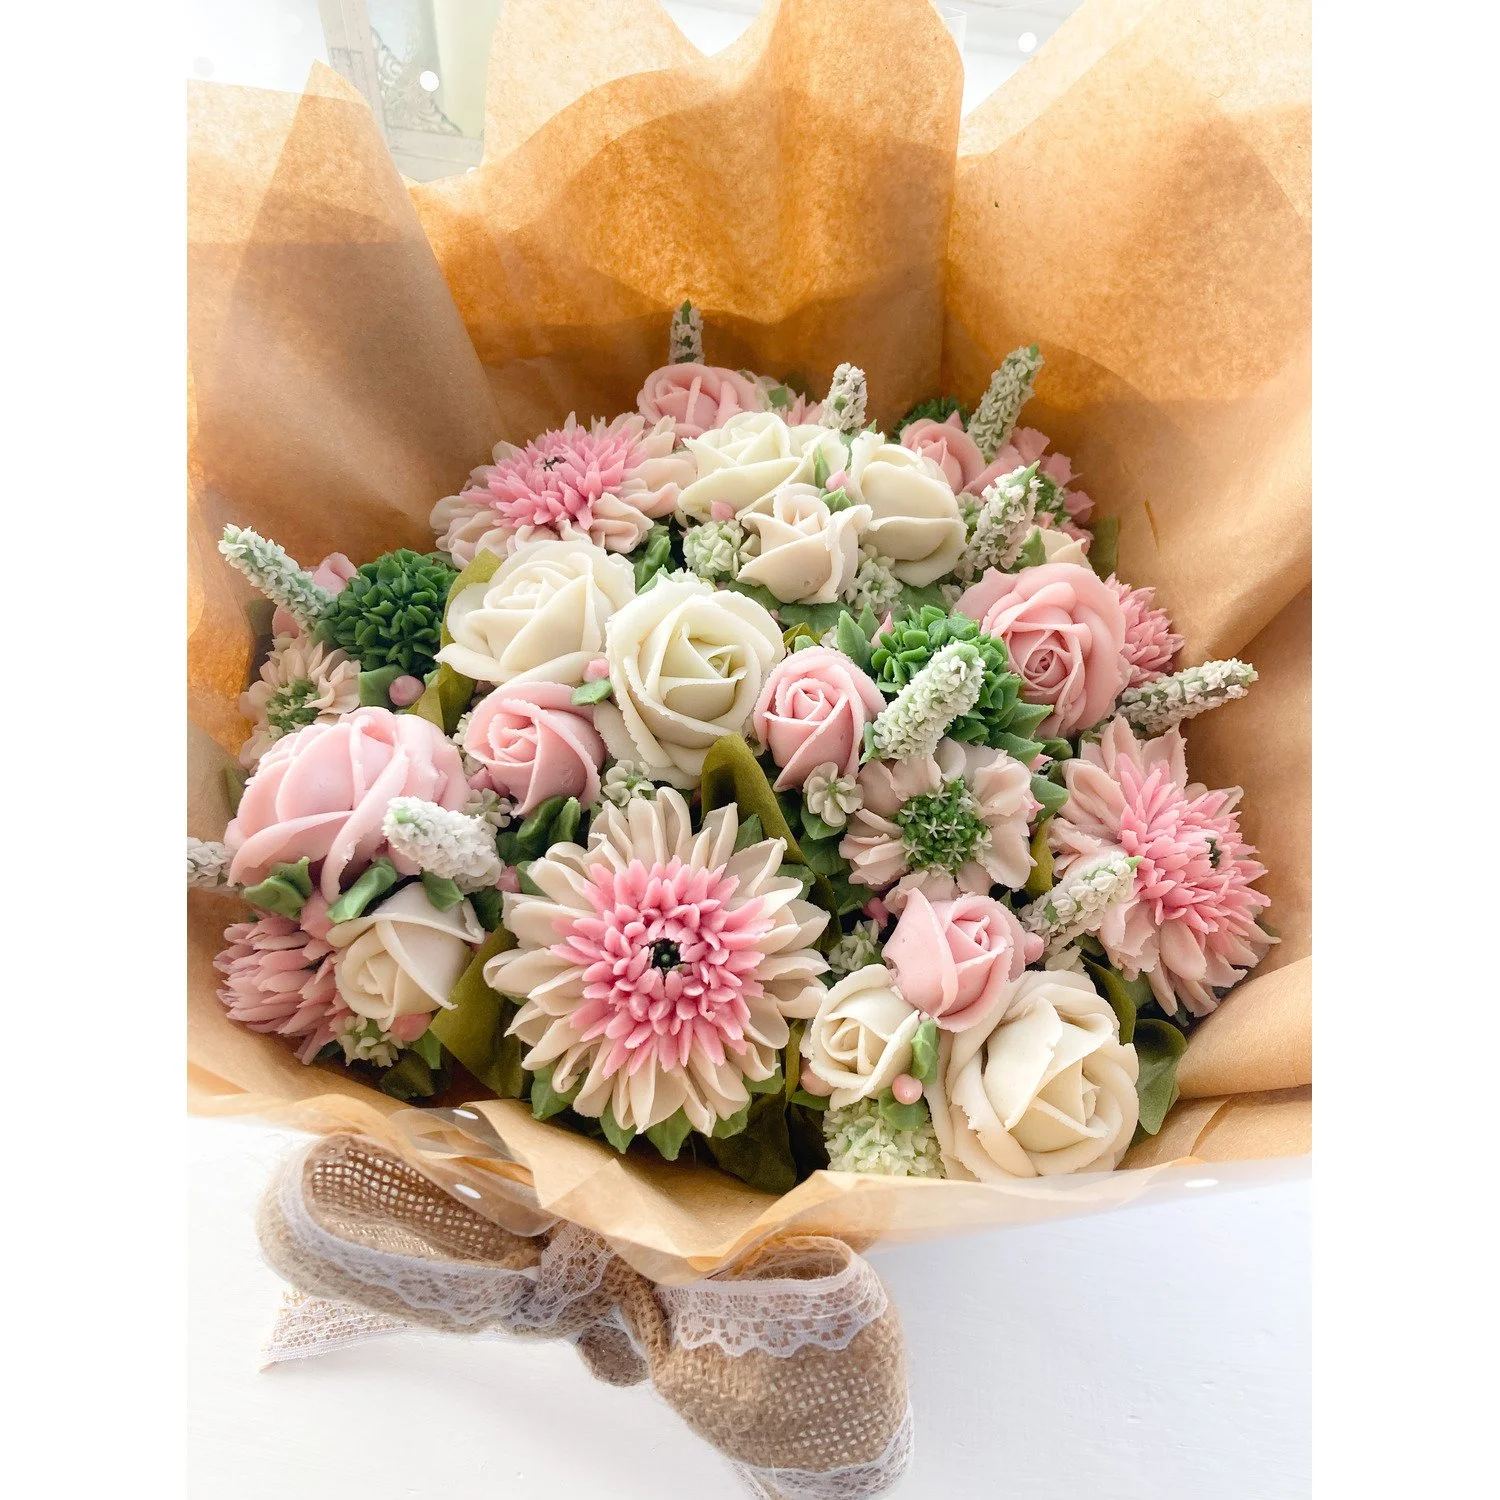
How To Make a Mini Cupcake Bouquet
Everyone seemed to love the mini cupcake bouquet that I uploaded to Instagram and Facebook. So I thought I would make a little tutorial on how to put one together yourself.

I’ve added a little video to the end of this blog showing how to load and wrap one of these pretty mini cupcake bouquets. The measurements for the tissue paper and cellophane are as follows
Cellophane 26cm by 26cm
Tissue paper 25cm by 17cm
Tissue paper squares 9cm by 9cm
.
Some of the items used are available to purchase on our online shop
Mini cupcake cases purchase here
Mini cupcake tin purchase here
Mini cupcake cups purchase here
Tissue paper purchase here
Ribbon purchase here
IN THE VIDEO YOU WILL SEE THAT I USE 1 TISSUE PAPER SQUARE FOR EACH CUPCAKE, EXCEPT FOR THE LAST CUPCAKE. TO AVOID THE CUPCAKES SLIPPING INTO THE CUPS, I ADVISE USING 2 SQUARES OF TISSUE PER CUPCAKE INSTEAD.

What I love most about the mini cupcake bouquets is how quick they are to make. This bouquet took me about 20 minutes to make (excluding baking time) and I just think they look so cute. They can literally fit in the palm of your hand.


I really hope you all enjoy the tutorial and that lots of you have a go making one. If you do, please send me some photos.
Love Kirsty x
december 2025 update:
measurements for a 12 mini cupcakce bouquet
cellophane 40cm x 40cm
tissue paper 1, 50x70cm sheet cut into 4.
12 mini cupcake bouquet
Chocolate Cupcake Recipe

Chocolate Cupcake Recipe
Here is the recipe for my moist and delicious chocolate cupcakes. The cupcakes are great to pipe flowers on to but my favourite is to inject Biscoff into the centre of them! enjoy!
Ingredients
180g Butter or margarine
3 Eggs
180g Caster sugar
140g Self-raising flour
40g Cocoa Powder
2 tbsp full fat mik
2 tbsp oil
Flavourings of your choice
Makes: 12 cupcakes
Instructions
Preheat your oven to 160C/320F/ GAS MARK 3 or 140C/284F fan. Line your muffin tin with muffin cases.
Use your stand mixer with the whisk attachment or a hand mixer. Mix butter, sugar, and your flavourings on high speed for 5 minutes, scraping the bowl's sides halfway through. This is called the creaming stage
Add flour, Cocoa powder, eggs, milk, and oil. Mix for 2 more minutes until you have a glossy smooth cake batter. Use a large ice cream scoop to add one scoop of cupcake mix to each muffin case.
Cook in the centre of the oven for approximately 25 minutes. All ovens vary so be sure to check on the cupcakes through the glass after 20 minutes cooking
Remove from the oven and leave the cupcakes in the tray for 30-60 seconds, then transfer them onto a wire rack to cool down.
Once cool, decorate them or store in a zip lock bag/Tupperware box and freeze until needed.
Flavour Variations
Chocolate vanilla: 2 teaspoons of vanilla extract per 12 cupcakes.
Biscoff: Use an apple corer or a sharp knife to remove a small amount of the centre of the cupcake and pipe Biscoff directly into the centre of the cupcake
Nutella: Use an apple corer or a sharp knife to remove a small amount of the centre of the cupcake and pipe Nutella directly into the centre of the cupcake
Chocolate caramel: Use an apple corer or a sharp knife to remove a small amount of the centre of the cupcake and pipe caramel directly into the centre of the cupcake
Chocolate Orange: Juice of one orange plus finely grated rind per 12 cupcakes, added in the final mixing stage. Or 2 teaspoons of orange extract added at the creaming stage.
Mint choc chip: Add peppermint extract to taste during creaming stage. Fold 150g of dark chocolate chips into the mixture at the end. Coat your chocolate chips in flour first, this helps to stop them sinking to the bottom of the cupcake case
Chocolate Chip: 150g chocolate chips or chopped chocolate (a combination of milk and white works best), folded in after mixing. Coat your chocolate chips in flour first, this helps to stop them sinking to the bottom of the cupcake case.
FAQs
My cupcake cases are peeling. What did I do wrong?
Sometimes it can be due to using low-quality cupcake cases. I only ever use Dr Oetker muffin cases as they are great quality. Most of the time the cupcakes haven’t been baked long enough or you left them in the tin to cool for too long.
My cupcakes are TOO dark when they come out of the oven, what went wrong?
Everyone’s ovens are slightly different. The issue can also be that your oven is running hotter than the setting you put it on. Invest in a thermometer that goes inside your oven to ensure your temperature is accurate.
My cupcakes have sunk when I removed them from the oven. How can I stop this?
If they are sinking, they are underbaked. You need to check your oven temperature is accurate, and if it’s not, adjust accordingly. Make sure you don’t remove them from the oven too early or open the oven door during cooking.
What size muffin case should I use?
I use Dr Oetker muffin cases which are the following measurements:
Base 5cm wide
Top 8cm wide
Height 4cm
I can’t get self-raising flour in my country, what can I do?
You need to add 2 teaspoons of baking powder to your plain all-purpose flour, per 12 cupcake mix.
How do I make this dairy-free?
Use margarine instead of butter and oat milk instead of cow's milk.
How can I make the cupcakes gluten-free?
Substitute flour for gluten-free flour. Add in 1/4 xantham gum per 250g of flour to help bind the ingredients together.
How many trays of cupcakes can I bake at once?
This depends on your oven size but for a standard home oven I would only ever bake 2 trays at a time. In the middle of the oven. If you bake them at the top they will overcook and baking them at the bottom means they will be undercooked.
The tops of my cupcakes are slightly hard, is this normal?
Yes! These cupcakes will form a slight crust (like bread when it forms a crust) but once you’ve flat iced your cupcake, this will completely soften the top. You could also use a small amount of sugar syrup on top. Freezing the cupcakes will also soften the top. Please don’t be put off by the top having a slight “crust”. All cakes do.
My cupcakes have risen over the top of the cases when baking. What happened?
You’ve put too much batter in the cases. You want to make sure the cupcake cases are no more than 2/3 full.
I really hope you enjoy making these cupcakes. Do let me know how you get on in the comments section below.
Kirsty x

Mother’s Day Cupcake Orders Preparation: Top Tips for a Successful Baking Experience
Mother’s Day is a very busy time for bakers, especially those crafting delightful floral cupcakes – a perfect gift for mums. As someone who has navigated through busy Mother’s Days, I'm eager to share some invaluable tips that have been my guiding light. Feel free to add your insights in the comments below.
1. Know Your Limits
Consider your time, capabilities, and experience when deciding on the number of orders you are willing to take on. Don't overcommit, especially if it's your first year. Start small and build your confidence.
2. Simplify Your Offerings
Streamline your options to avoid overwhelming yourself. Stick to one design offering. Offer a cupcake box of 6 and a bouquet of 7 for example. Opt for one cake flavour, vanilla is a safe bet. Keep it simple and manageable.
3. Choose Manageable Designs
Opt for flower designs that aren't overly intricate, saving your hands from excessive strain. Try to avoid flowers like mini chrysanthemums, Scabiosa, proteas etc. instead opt for flowers like Roses, 2D hydrangeas, swirl roses, and tulips using Russian nozzles are excellent choices. You can have one fancy statement flower in the centre of your bouquet with more basic designs for the rest. Remember, customers don't expect complex flowers; colours can elevate a simple design so it looks more complex.
4. Preparation Is Key
Ensure a smooth operation by preparing in advance:
Make all of your buttercream ahead of time.
Bake and freeze cupcakes, ready for piping.
Put together bouquet structures, cupcake boxes, cake boxes, bows, labels and allergen stickers in advance.
Pipe any mini flowers early and refrigerate.
Triple-check your orders as it’s so easy to miss one and confirm only with full payment. Remember if you don’t take full payment it’s highly likely you’ll have some no shows.
5. Pipe in Stages
Start piping your cupcakes the day before collection, beginning with lighter shades and progressing to darker ones. Utilise any leftover buttercream for foliage by adding all left over buttercream in a bowl with a good squirt of green. (This only works with pastel shades being mixed together. If you do this with dark shades it’s likely you’ll end up with brown buttercream)
6. Assemble Thoughtfully
Start assembling bouquets and cupcake boxes once you’ve finished piping. Count orders at least twice, ensuring nothing is missed. Remember it’s easier to rectify a mistake or missed order the day before collection.
7. Set Collection Slots
Assign collection slots during the booking process. Opt for collections a day before the event to manage the workload. I assign everyone with a 15 minute window to collect their orders.
8. Prioritise Self-Care
Start early on the event day, and take breaks if needed. If your hands ache, don't hesitate to stop and rest. Soak your hands and wrists in hot water to alleviate muscle aches and cramps.
Mother’s Day is a fantastic opportunity to boost sales and showcase your skills. Be honest about your capabilities, stay organised, and enjoy the rewarding process of creating beautiful cupcakes for mums. Happy piping and good luck xx
P.s I’ve added some pictures of some of my simple bouquets below. Feel free to copy any of these for your Mother’s Day bouquets. They are easy to pipe but still very pretty.


Flat Top Cupcake Recipe

Flat Top Cupcake Recipe
Baking cupcakes that not only taste delicious but also look picture-perfect can sometimes be a challenge. Domed cupcake tops might not always be the best canvas for your buttercream florals. This cupcake recipe will make beautiful flat-topped cupcakes that not only taste great but are perfect for your buttercream flowers.
Ingredients
180g Butter or margarine
3 Eggs
180g Caster sugar
180g Self-raising flour
2 tbsp full fat mik
1 tbsp oil
Flavourings of your choice
Makes: 12 cupcakes
Instructions
Preheat your oven to 160C/320F/ GAS MARK 3 or 140C/284F fan. Line your muffin tin with muffin cases.
Use your stand mixer with the whisk attachment or a hand mixer. Mix butter, sugar, and your flavourings on high speed for 5 minutes, scraping the bowl's sides halfway through. This is called the creaming stage
Add flour, eggs, milk, and oil. Mix for 2 more minutes until you have a glossy smooth cake batter. Use a large ice cream scoop to add one scoop of cupcake mix to each muffin case.
Cook in the centre of the oven for approximately 25 minutes. All ovens vary so be sure to check on the cupcakes through the glass after 20 minutes cooking
Remove from the oven and leave the cupcakes in the tray for 30-60 seconds, then transfer them onto a wire rack to cool down.
Once cool, decorate them or store in a zip lock bag/Tupperware box and freeze until needed.
Flavour Variations
Vanilla: 2 teaspoons of vanilla extract per 12 cupcakes.
Lemon: Juice of one lemon plus finely grated rind per 12 cupcakes added during fins mixing stage or 2 teaspoons of lemon extract added at creaming stage.
Biscoff: One heaped tablespoon of Biscoff per 12 cupcakes added at the creaming stage.
Oreo: Half a package of crushed Oreo biscuits per 12 cupcakes, folded in after incorporating all ingredients.
Nutella: Two heaped tablespoons of Nutella per 12 cupcakes, added at the creaming stage.
Raspberry and White Chocolate: 150g white chocolate and two handfuls of frozen raspberries per 12 cupcakes, folded in after mixing. Coat your raspberries in flour first, this helps to stop them sinking to the bottom of the cupcake case.
Orange: Juice of one orange plus finely grated rind per 12 cupcakes, added in the final mixing stage. Or 2 teaspoons of orange extract added at the creaming stage.
Chocolate Chip: 150g chocolate chips or chopped chocolate, folded in after mixing. Coat your chocolate chips in flour first, this helps to stop them sinking to the bottom of the cupcake case.
FAQs
My cupcake cases are peeling. What did I do wrong?
Sometimes it can be due to using low-quality cupcake cases. I only ever use Dr Oetker muffin cases as they are great quality. Most of the time the cupcakes haven’t been baked long enough or you left them in the tin to cool for too long.
My cupcakes are dark brown when they come out of the oven, what went wrong?
Everyone’s ovens are slightly different. The issue can also be that your oven is running hotter than the setting you put it on. Invest in a thermometer that goes inside your oven to ensure your temperature is accurate.
My cupcakes have sunk when I removed them from the oven. How can I stop this?
If they are sinking, they are underbaked. You need to check your oven temperature is accurate, and if it’s not, adjust accordingly. Make sure you don’t remove them from the oven too early or open the oven door during cooking.
What size muffin case should I use?
I use Dr Oetker muffin cases which are the following measurements:
Base 5cm wide
Top 8cm wide
Height 4cm
I can’t get self-raising flour in my country, what can I do?
You need to add 2 teaspoons of baking powder to your plain all-purpose flour, per 12 cupcake mix.
How do I make this dairy-free?
Use margarine instead of butter and oat milk instead of cow's milk.
How can I make the cupcakes gluten-free?
Substitute flour for gluten-free flour. Add in 1/4 xantham gum per 250g of flour to help bind the ingredients together.
How many trays of cupcakes can I bake at once?
This depends on your oven size but for a standard home oven I would only ever bake 2 trays at a time. In the middle of the oven. If you bake them at the top they will overcook and baking them at the bottom means they will be undercooked.
The tops of my cupcakes are slightly hard, is this normal?
Yes! These cupcakes will form a slight crust (like bread when it forms a crust) but once you’ve flat iced your cupcake, this will completely soften the top. You could also use a small amount of sugar syrup on top. Freezing the cupcakes will also soften the top. Please don’t be put off by the top having a slight “crust”. All cakes do.
My cupcakes have risen over the top of the cases when baking. What happened?
You’ve put too much batter in the cases. You want to make sure the cupcake cases are no more than 2/3 full.
I really hope you enjoy making these cupcakes. Do let me know how you get on in the comments section below.
Kirsty x
Flower Piping Buttercream Recipe
Flower Piping Buttercream Recipe

For flower piping you need a stiff CONSISTENCY buttercream that will hold its shape. My recipe is an American buttercream and it consists of two ingredients using a 2:1 ratio. Adding liquids to your buttercream will affect the consistency and you will find your petals won’t hold their shape, plus it will melt much quicker. I’ve used this recipe for many years and following my method of mixing you will be able to produce beautiful buttercream flowers.
Ingredients
🦋 A stand mixer with a paddle attachment
🦋 500g of pure butter (salted or unsalted)
🦋 1kg icing sugar
Method
Your butter needs to be firm but not straight from the fridge. I tend to remove mine from the fridge about an hour before I need to make my buttercream. In summer this time is shorter. Your butter should be firm but you should be able to leave a small indent in it with your finger.
Add the butter to your mixer with the paddle attachment (do not use the whisk attachment as this will pump air into the buttercream) and mix on high for approximately 30 seconds. You just want to break the butter up at this point. Lots of people feel tempted to whip their butter at this stage to ensure it becomes more pale in colour. This is a big no no for flower piping. You’ll end up with a buttercream that’s full of air bubbles and it will produced flowers that have a spongy appearance.
Add in 500g of icing sugar, sift the sugar to remove any lumps and clumps. Mix slowly to begin with to ensure you don’t create a huge cloud of icing sugar. Gently increase the speed to medium/high, the moment the icing sugar is incorporated with the butter stop mixing. This part of the process takes me no longer than two minutes.
Add the remaining 500g of icing sugar and follow the same method as the last step. Don’t be tempted to keep mixing. As soon as the butter and icing sugar are incorporated you must stop mixing. The key here is to not add lots of air into your buttercream.
Total mixing time is roughly 4-5 minutes. You will be left with a very firm stiff buttercream icing that is perfect for piping flowers.
FAQ
How do I lighten my buttercream if I can’t whip my butter first?
I remove as much of the yellow tones as possible before I add in the icing sugar. I do this by adding in a few drops of purple and blue Colour mill food colour to the butter at the very first stage. This won’t make a bright white icing but it will remove a lot of the yellow undertones. How many drops you need will depend on how yellow your butter is to begin with. Start off with one or two and increase slowly. Remember you can add more but you can’t take it away. See the video at the bottom of this page for reference. You can also add whitener to your finished icing, but be mindful adding too much can alter the appearance and consistency of your icing.
How long will this icing last?
This icing will not go off until the butter does. So the shelf life is usually long.
How do I store this buttercream?
Keep the buttercream in the fridge. I don’t own a microwave, so I remove the buttercream from the fridge about an hour or two before I need to use it. This depends on the current season. An hour before use in summer is fine, but in winter I’ll need two hours really. You can also use a microwave on short blasts to loosen it up.
Is this recipe any good for a hot climate?
This is where things become tricky. It’s essentially butter, which we all know melts when it’s hot. It’s much harder to pipe flowers in summer than it is in autumn or spring. The heat does effect it. Those of us in the UK tend to use icing packs with a tea towel on top, to place our piping bags on. We also end up putting the icing in and out of the fridge when we are working with it. If you live in a very hot and humid climate, you may need to remove some of the butter and replace with shortening/Trex. This will be trial and error though. It’s something you’ll need to play around with to find a ratio that works for you and your climate.
Can I flavour the icing?
Definitely but you need to be careful about liquid flavourings. I personally use Dr Oetker vanilla extract and the consistency is syrup like. So it doesn’t change my buttercream. Adding liquids to this buttercream can change how well it pipes. So please be mindful of this. 2 teaspoons of extract should be fine but it depends on personal taste. Another good way of changing the flavour is to use flavoured icing sugars.
Why can’t I use my whisk attachment on my mixer?
Simply put you’ll create too much air and the buttercream consistency will be off. Only ever use the paddle attachment.
What food colours can I use on this buttercream?
I recommend either gel or paste colours. You can use oil based colours but adding too much will change the consistency. If using oil based go for pastel shades as it will use less food colouring. I personally use Sugarflair, ProGel and Fractal colours. All available to purchase here.
I’m finding this hard to pipe with in winter, can you help?
Winter piping is just as much of a nightmare as summer. The buttercream is so firm it can be difficult to use. You can use your microwave on short bursts until the buttercream is easier to pipe with. I personally use a tiny amount of boiling water, yes I know I said adding liquids isn’t good but it’s the only solution I have as I don’t own a microwave. So I will take a small amount of buttercream in its own bowl and I’ll add a 1/2- 1 teaspoon of boiling water to it. It softens it up just enough so I can pipe with it.
My piping bags keep bursting when using this icing, why is this happening?
This is a very firm buttercream and cheap bags won’t cut it. You must use strong good quality piping bags which do cost a bit more, but it’s worth it. I only ever use simply making biodegradable bags but we also sell their normal piping bags too. Both are very strong. You can also invest in some strong reusable piping bags. Another issue may be because you are overloading the piping bag. I only ever add about two heaped table spoons of icing to my bag at one time. The final issue may be the buttercream is too cold. See my previous response for advice on how to solve this issue.
I like to use cream or milk in my icing, can I add it to this recipe?
I wouldn’t advise it. Adding liquids will make the buttercream much softer which won’t produce the results you are looking for. Stick to the recipe. If it’s not to your taste perhaps try a Korean style meringue based recipe.
Can I make this recipe vegan?
Yes you can. If you are in the UK, I recommend using the Flora vegan butter blocks. If not a dairy free spread will suffice, you will definitely need to add some kind of flavouring extract though like vanilla or lemon etc. I use a 4:1 ratio. 250g vegan butter to 1kg icing sugar. The vegan butter can be used directly from the fridge. It is slightly different to work with than real butter but you can still achieve good results. Store in the fridge until the vegan butter expires.

Buttercream flower piping in summer top tips 🌺
Summer is here, and while it brings warm sunshine and cheerful vibes, it also brings challenges for bakers, especially when it comes to piping delicate buttercream flowers. As the temperatures rise, so do the frustrations of dealing with droopy petals and shiny buttercream. But fret not! We've gathered a bouquet of handy hints and tips to help you conquer the summer heat and achieve stunning buttercream flower creations. So, grab your piping bags and let's dive into these easy to follow tips to make your summer piping a breeze.

1. Choose the Right Time to Pipe
Timing is everything! Instead of battling the midday heat, opt for early mornings or evenings when the temperatures are cooler. This will give you far better conditions to work with your buttercream and create picture-perfect flowers.
2. Control Room Temperature
Keep your room cool by using fans and if possible investing in a portable air conditioning unit. To maintain the optimal temperature, avoid baking and piping simultaneously. Instead, complete your baking tasks either the day before or a few hours ahead of your piping schedule. Having the oven on whilst piping will increase the temperature in the room dramatically.
3. Pipe on Frozen Cupcakes
Preserve the firmness of your buttercream flowers by piping them onto frozen cupcakes. This smart trick will help set your delicate blooms and keep them looking fresh even in the summer heat.
4. Stay Cool and Comfortable
In summer dressing right matters! Wear lightweight and breathable clothing to prevent adding to your body's temperature. Additionally, cool off by running your hands under cold water or indulging in a quick foot soak. Staying calm and collected will improve your piping results.
5. Use Ice Packs to Keep Buttercream Cool
Keep your buttercream at the right consistency by placing your piping bags on ice packs wrapped in a tea towel. Having multiple piping bags ready allows you to switch and avoid overheating the buttercream.
6. Chill Buttercream in Small Batches
Divide your buttercream into smaller bowls and use the fridge to cool them down. A quick 10-minute chill can work wonders for maintaining the ideal piping consistency.
7. Chill Decorated Cupcakes Before Loading
Prevent smudges on your cupcake bouquet wrapping and ensure smooth bouquet loading by refrigerating your decorated cupcakes for 30 minutes. This brief cooling period will firm up the buttercream, making your life much easier. And no it will not dry out your cupcakes.
8. Avoid Freezing Flowers
Resist the temptation to use the freezer for your individually piped buttercream flowers. The drastic temperature change when you remove them from the freezer, can lead to softening and condensation. Instead, opt for the fridge and allow the flowers a little more time to cool.
9. Keep Flower Designs Simple
In the heat of summer, less is more! Opt for simple flower designs that you can confidently and quickly pipe. Remember the longer you hold that piping bag for, the more the buttercream will melt. Save the experimentation for cooler seasons when buttercream is more cooperative.
10. Properly Store Decorated Cupcakes
After decorating, keep your masterpieces covered in a cardboard box or cupcake box, stored in a cool and dark room. Shut the curtains and utilise fans to maintain a cooler environment, ensuring your creations look their best until customer pickup.
11. Freeze Fully Decorated Cupcakes
For a time-saving solution, bake in the morning, pipe at night, and freeze fully decorated cupcakes. Thaw them for a few hours in the fridge before pickup or delivery, and your customers will enjoy beautiful, moist cupcakes with no complaints!
12. Prevent Grease Stains
Put an end to grease stains on your bouquets with an additional cellophane layer. Place down your cellophane, followed by the tissue paper layer, and then add another cellophane layer on top. This will prevent buttercream grease from transferring to your tissue paper and spoiling your beautiful bouquet.
13. Advise Customers Appropriately
Ensure your customers' satisfaction by reminding them to keep their car air conditioning on during pickup. Also, advise them to store the bouquet in a cool dark place and avoid direct sunlight until it reaches its final destination.
Conclusion
Piping buttercream flowers in the summer can be challenging, but with these expert tips, you'll master the art and breeze through the hottest days with confidence. So, gear up, apply these cool techniques, and create stunning buttercream flower cupcakes that will leave your customers in awe. Happy piping and enjoy a blooming success this summer!